Now that we’ve discussed the ways in which data will flow back and forth from your platform to Clutch, it’s important that we outline what functionality is required for the front end of the site for customers to interact with.
The main areas of interaction are as follows:
- “My Rewards” section within the customer’s account
- Cart & Checkout: Viewing, applying, and redeeming rewards during checkout
- Enrollment, Rewards Status & Balance Widget: Viewing reward balances in other areas of the site
- Potential Rewards Widget: Show possible points earned on various pages to incentivize conversion improvements.
Additionally, each of these sections should have conditional views depending on if a visitor is enrolled and/or logged in. In general, if a visitor is not logged in or enrolled, they should be encouraged to enroll or login. If they are enrolled or logged in, they should be shown information contextual to their account such as total points or available rewards.
When implementing these functions, it’s important to understand the value of a rewards program to ecommerce. Not only can the site provide customers with a location online to easily manage and view their rewards accounts, it can also serve as an important tool in helping conversion.
By showing customers’ rewards they might earn, or notifying them they have a reward available for redemption, customers are more likely to complete their checkouts.
 My Rewards
The My Rewards section is often branded with a name that the merchant has decided to use in branding their Loyalty Program.
Within the account section on the site, a Rewards section should be added. This section should include functionality and information to meet the following needs:
- Provide stand alone enrollment/opt-in form if brand has manual enrollment configured.
- Provide current reward status with visual indication of distance to next reward.
- Show any existing rewards and balances.
- Show reward account history.
- Provide information about the rewards program
- Provide reward account information such as member ID and any other information the merchant sets up as part of their customer profile.
- Provide program Terms and Conditions to be available for review by the consumer.
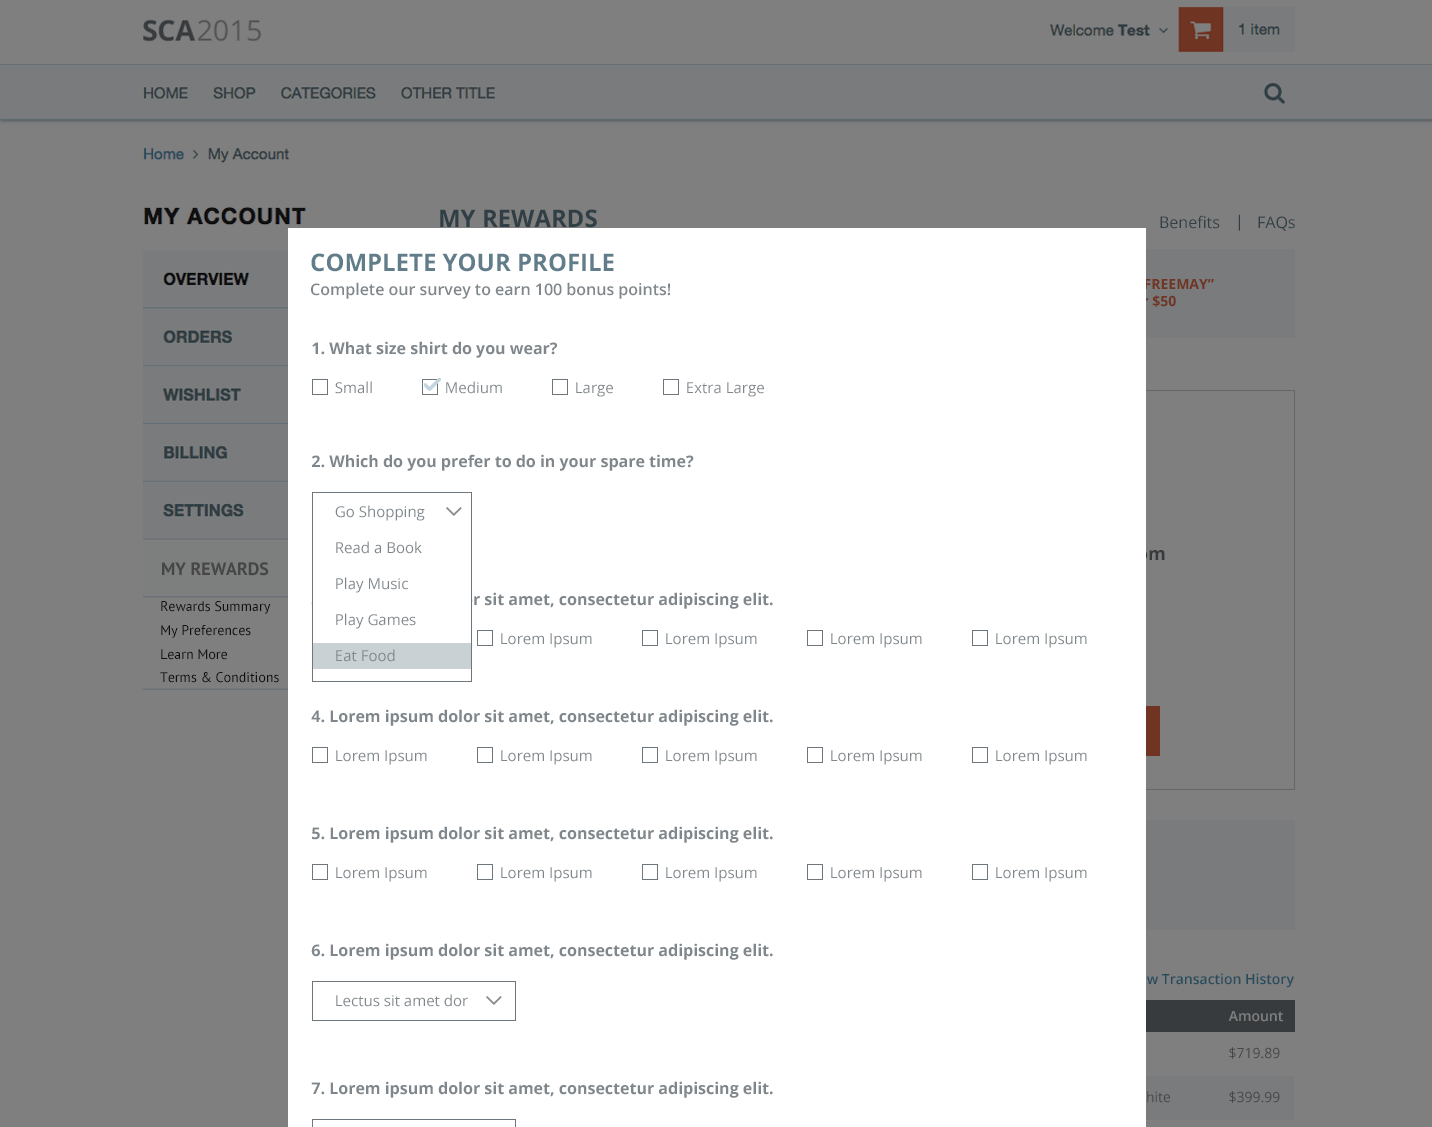
- Many brands will also provide a page within this section to collect and allow updates of preferences that will be sent via API to Clutch to later use for reporting and segmentation. (Favorite color, Clothing style, shoe size, etc.) These will correspond to fields in the Clutch database that will be prepared during the brand on-boarding process.
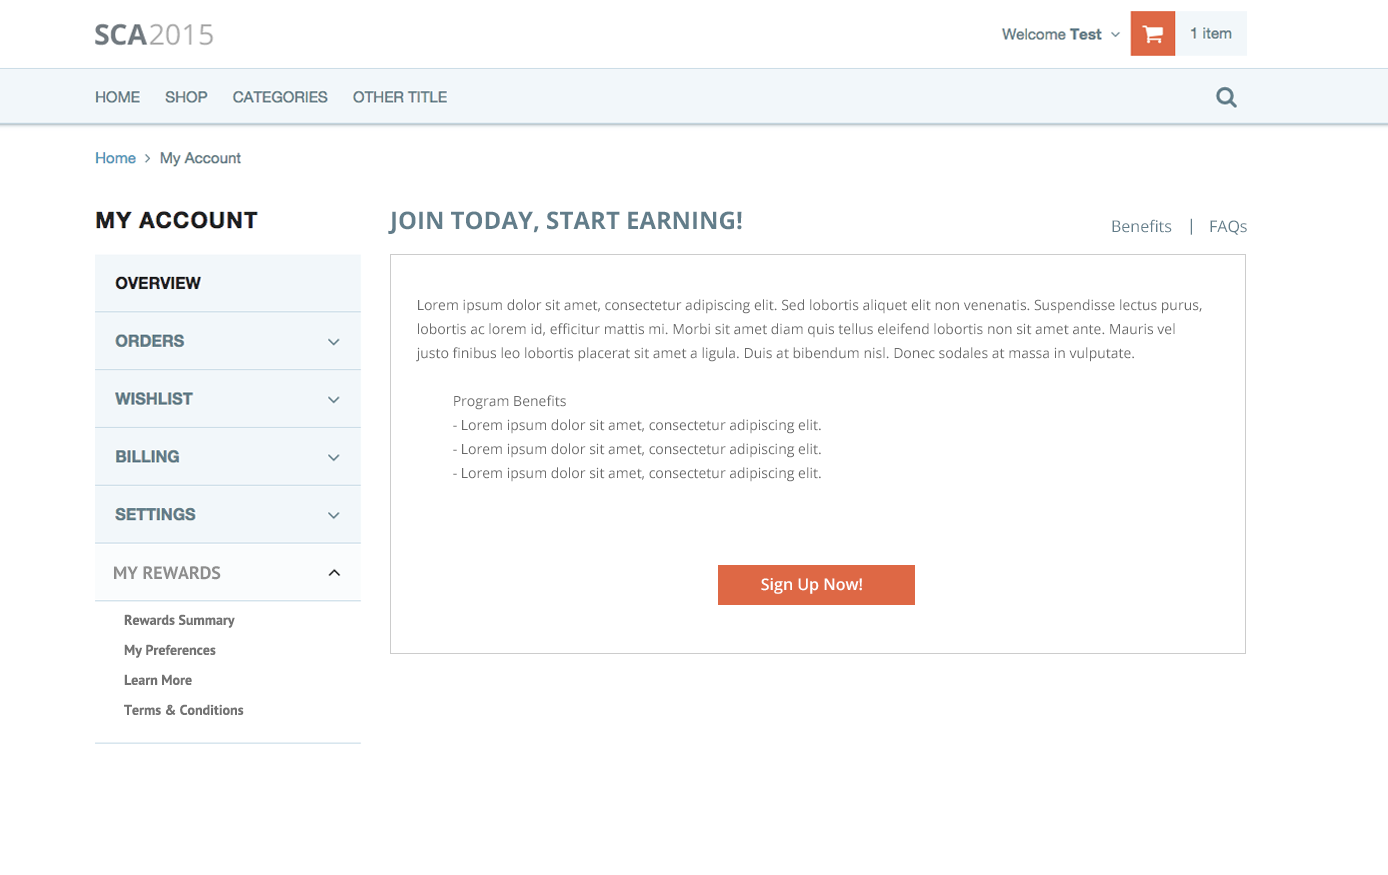
Non-Enrolled View
While a user will likely need to be logged in to see their rewards pages within their account, they may or may not be enrolled. This will depend on if you have enabled auto-enrollment for your merchant or not. In the event that auto-enrollment is not enabled, when a user navigates to this screen they should be provided with:
- General information about the rewards program including benefits and how it works.
- A strong call to action to signup.
- Terms and conditions
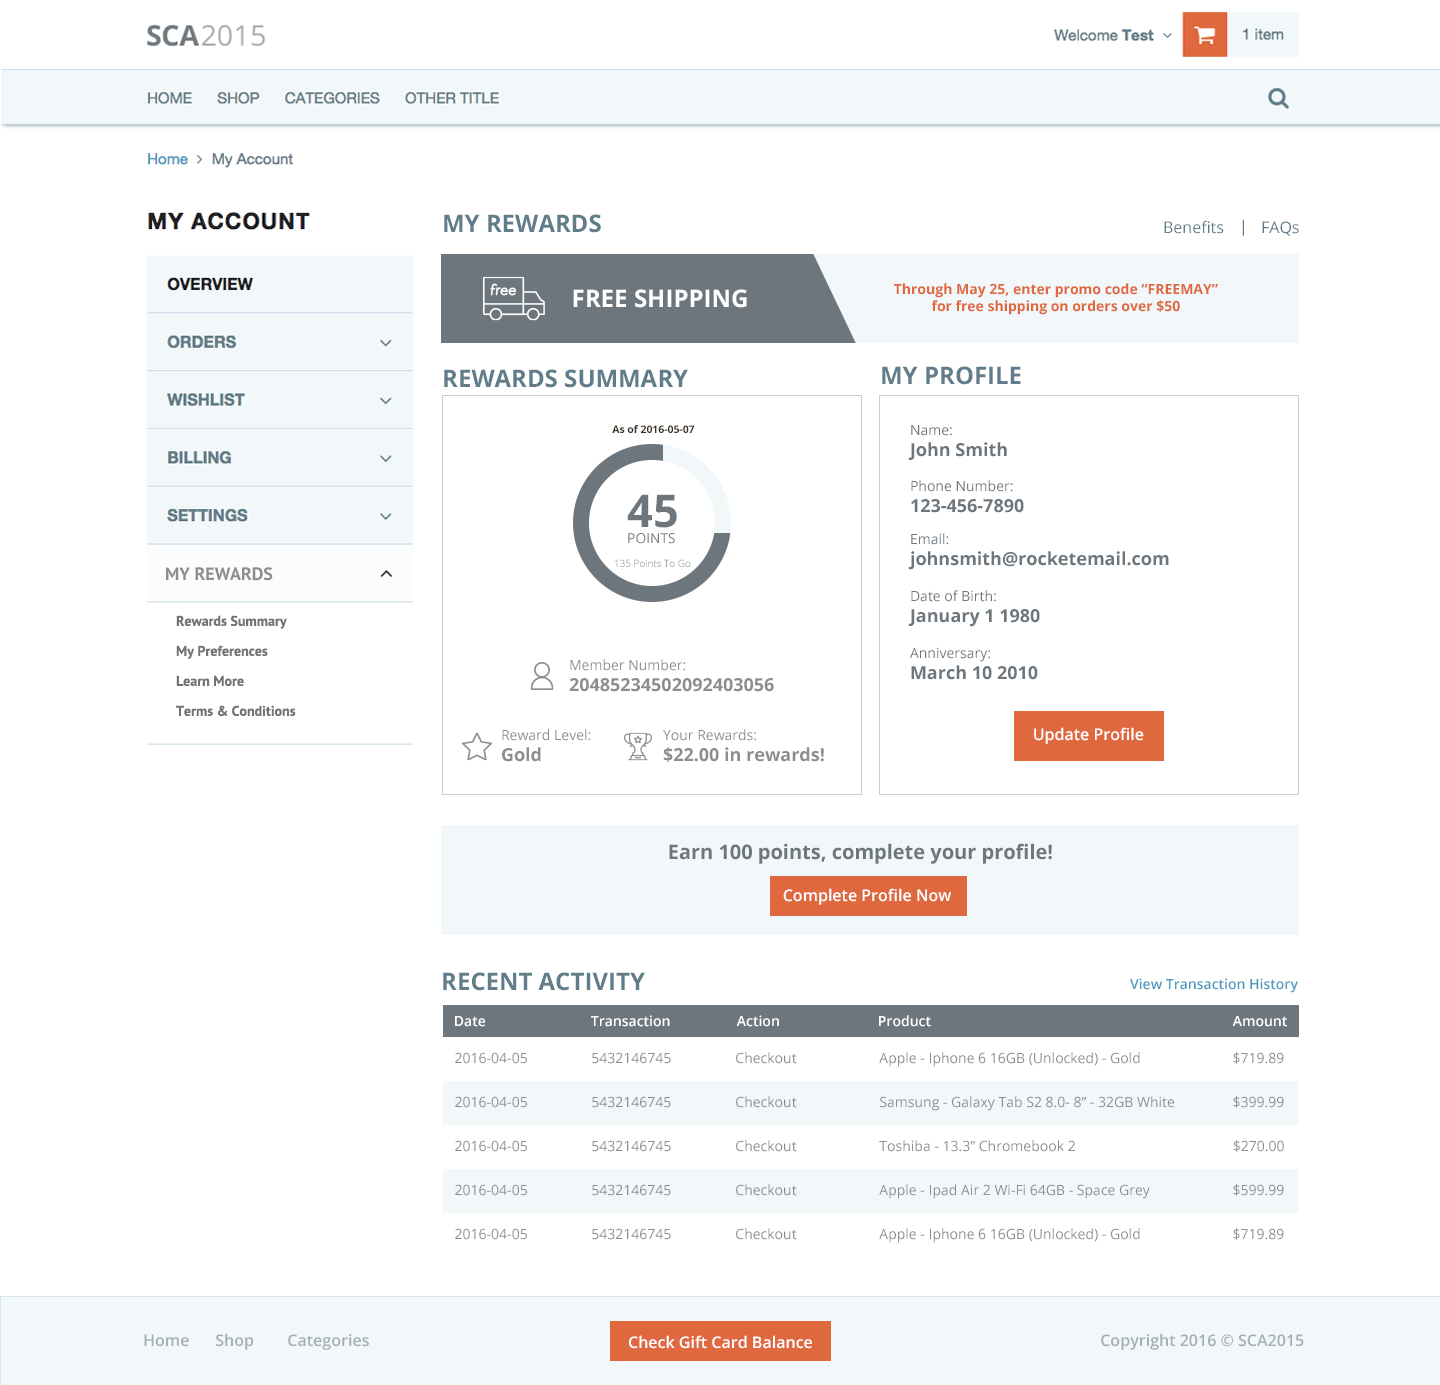
![]() Enrolled View
Enrolled View
If a user is enrolled and logged in, the view of the rewards screen should show a customer their rewards account information.
This information should be no older than 24 hours and ideally real time leveraging the Clutch APIs to pull and display info.
Information shown should include:
- Reward balances
- Visual indication of distance to next reward (will depend on program design)
- Member Number (if multi-channel)
- Reward Tier (if applicable)
- Incentive to complete profile (if not completed & if campaign is configured for merchant)
- Profile information (if not elsewhere within the Account section)
 Enhanced Customer Profile
As mentioned previously, one of the strategies to enable more personalized and targeted marketing for merchants that Clutch provides, is leveraging the rewards program to incentivize a customer to provide more detailed demographic information.
In order to do this, we recommend either:
- Adding the additional Clutch demographic fields (which can be custom fields created for each merchant) as a section of the customer’s website account
Or, - Creating a new section within the rewards account where these demographic fields can live.
No matter which approach is taken, it’s important that an incentive message be included on the page.
On the backend, an updateAccount API call is made and Clutch will automatically detect when the required fields for the incentive reward are provided. At that point the incentive campaign will issue the appropriate reward.
Sample of an account page with incentive:
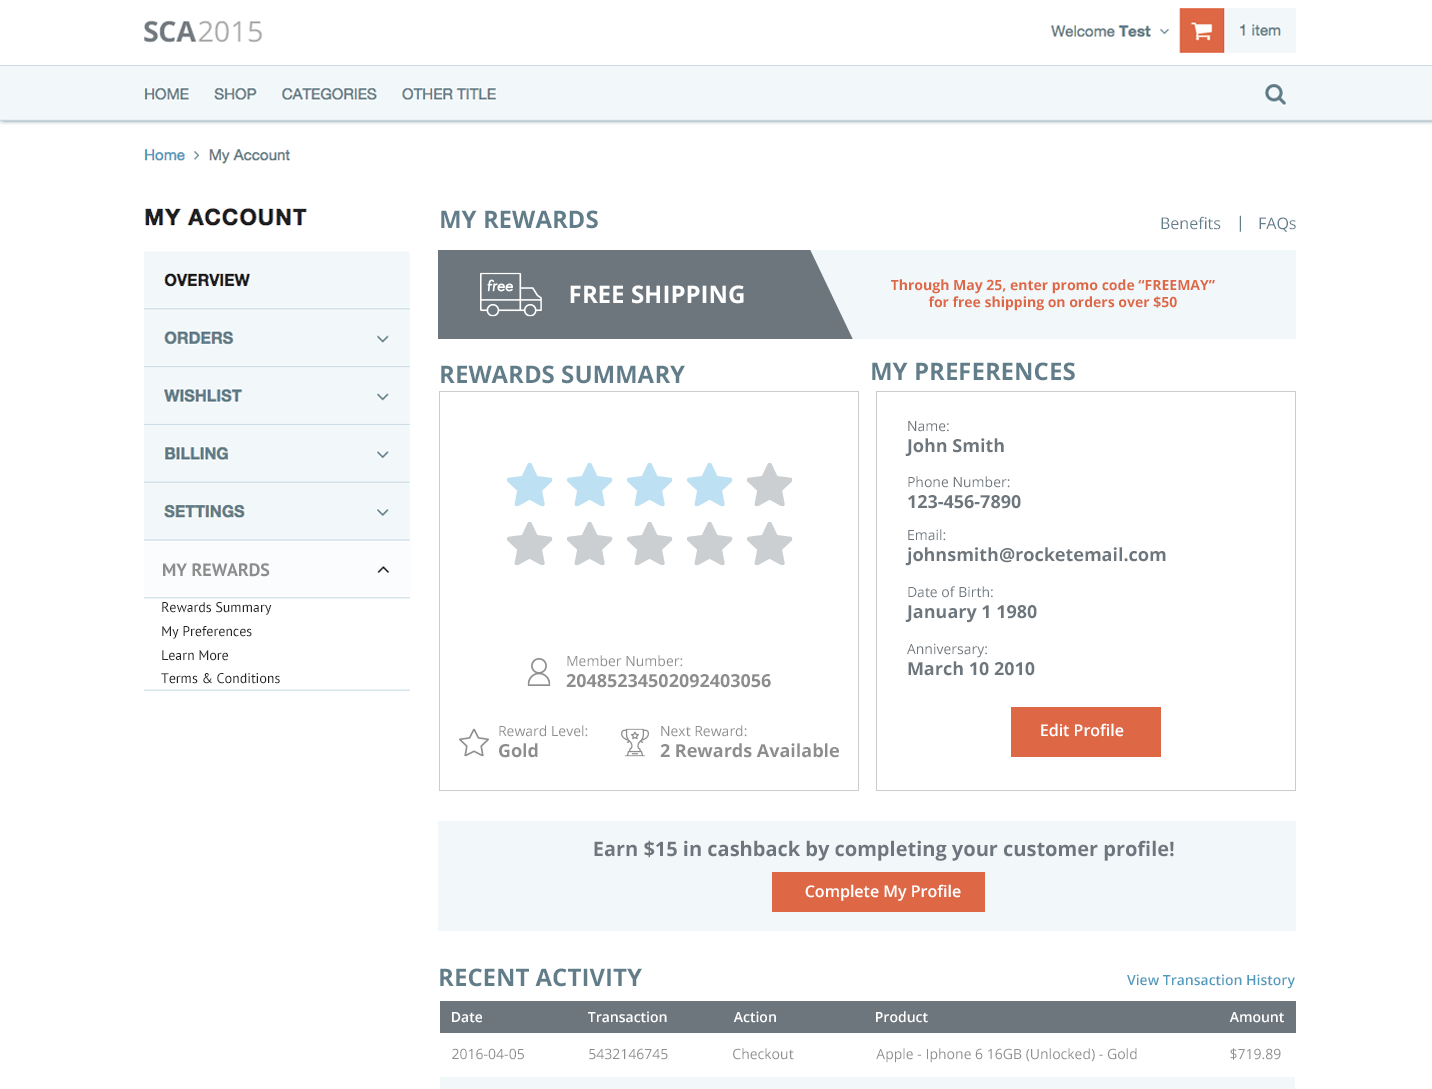
Sample of additional fields for “enhanced” profile:
Enrollment
Auto Enrollment
When it comes to the front end experience there is very little work to do. In fact with auto enrollment, you don’t need to make any front end changes. You simply do your customer search on the normal website account creation and either attach or allocate the resulting ID.
Standard Enrollment
If opting for standard enrollment there are two common implementations:
- A standalone enrollment page
- A checkbox opt-in on site registration or simple opt-in via button within the account (usually defaulted to “checked”)
NOTE: These two can also be used in conjunction
The important thing to understand is that you most likely have collected all the required information to enroll customers with standard site registration.
Account “Lookup”
In the scenario where accounts are being created through other channels (such as in-store) and email address is not being collected, you may also need to provide the customer a way to lookup and attach an existing account. This would end up taking the shape of a form where you ask for the identifying information (rewards number, phone number, etc) a customer would be able to associate with their existing account.
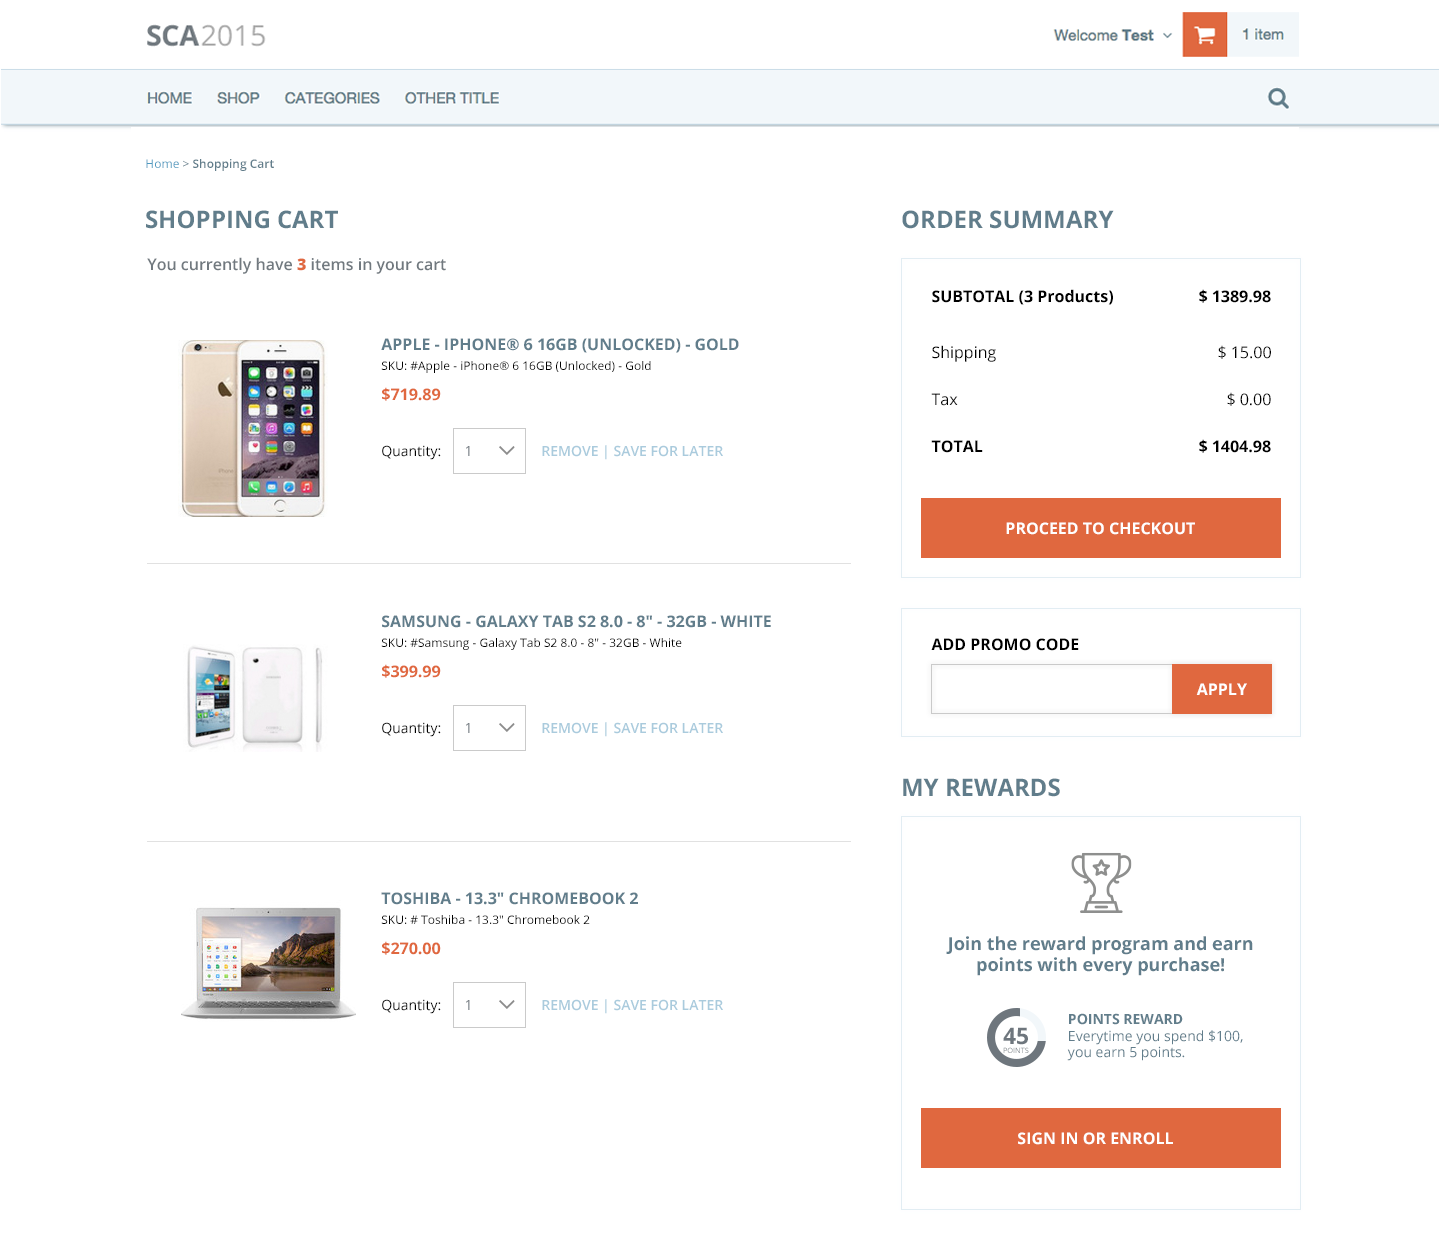
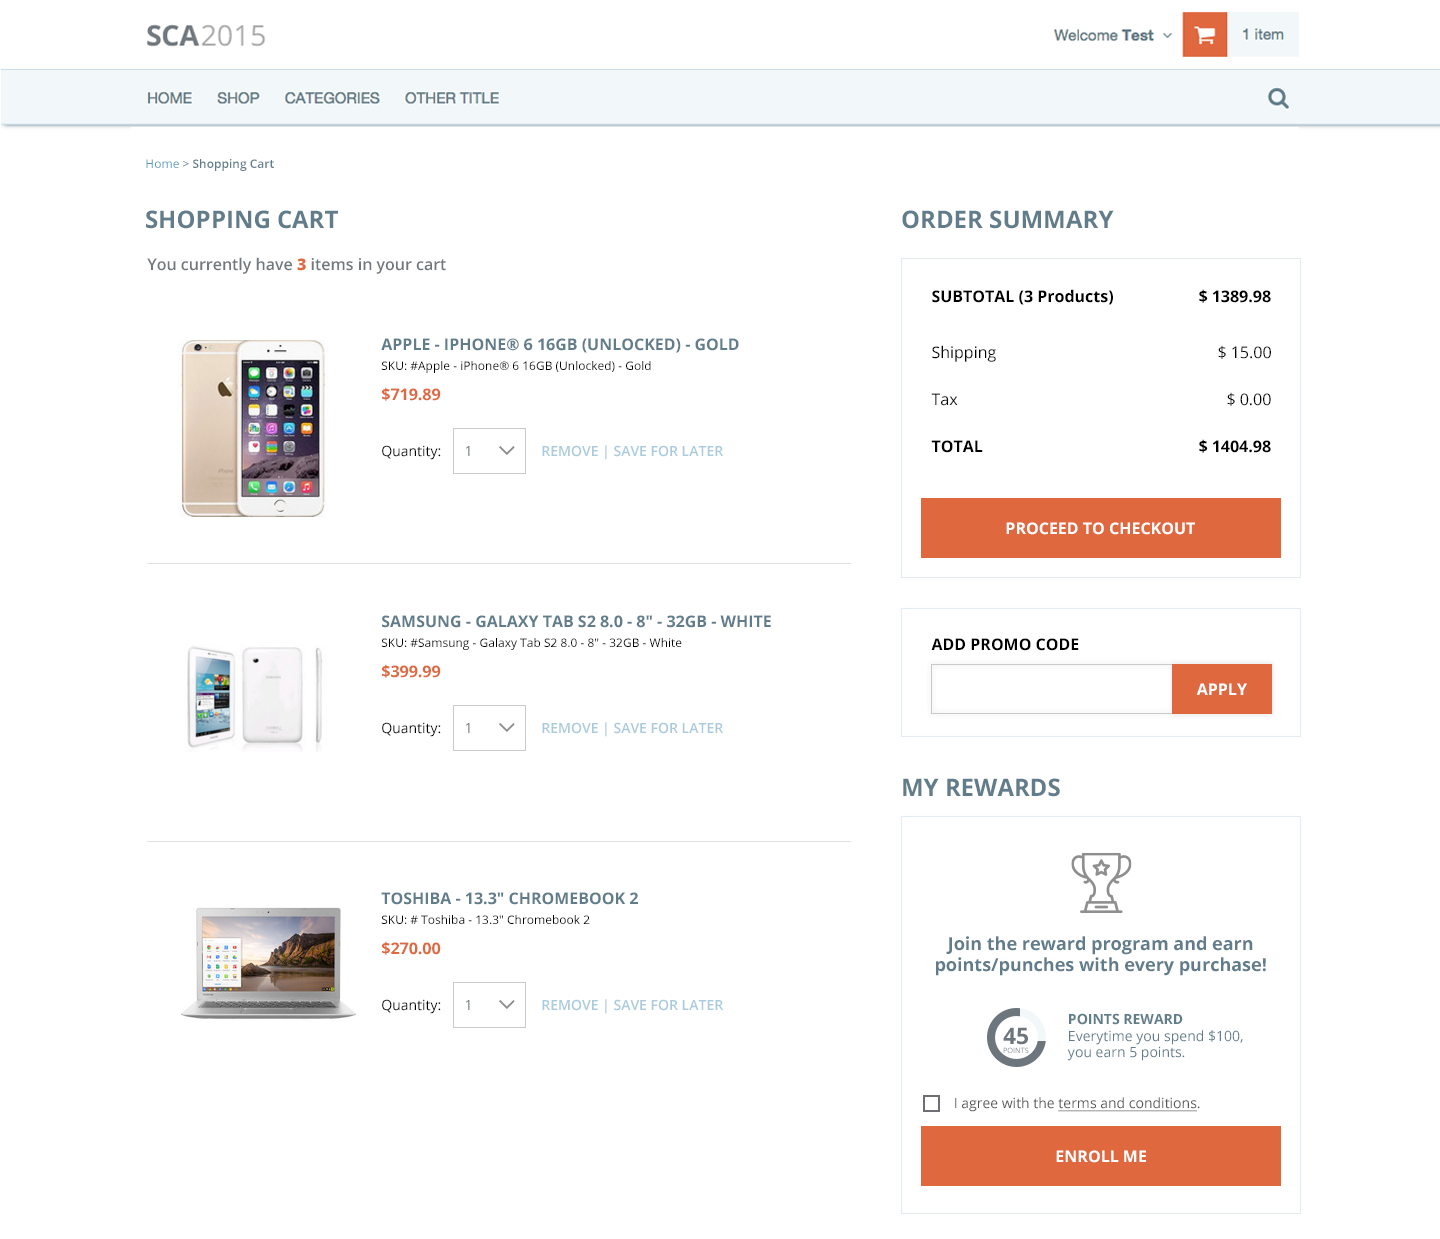
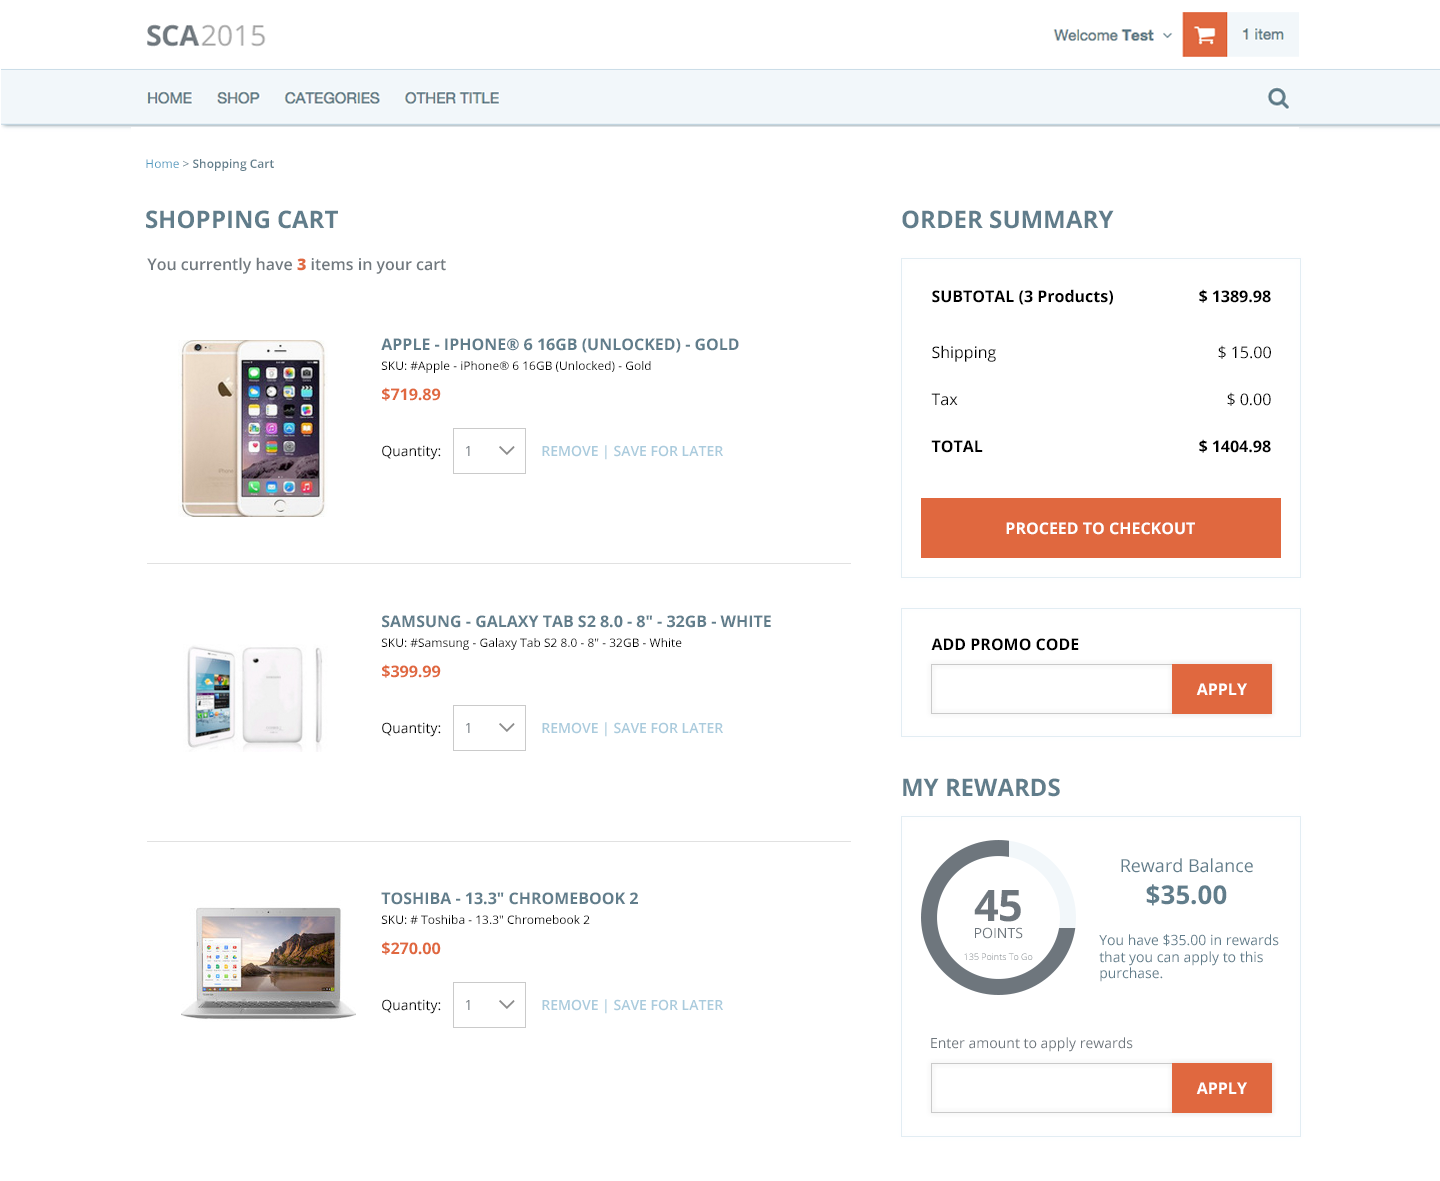
Shopping Cart
It’s well known that the shopping cart is a critical part of any ecommerce platform or site. It’s also a very important piece of integrating a rewards program. When it comes to this integration, the following functionality should be available:
- Viewing available reward balances
- Displaying any real time rewards a customer (signed in) may qualify for
- Redemption of rewards (typically “promo cash” applied as a discount)
- Information about how many rewards will be earned as a result of checking out with the cart contents selected.
Because users may or may not be logged in when viewing the cart, these reward content sections should be conditional. We have provided samples for each of the possible states for a shopping cart rewards widget.
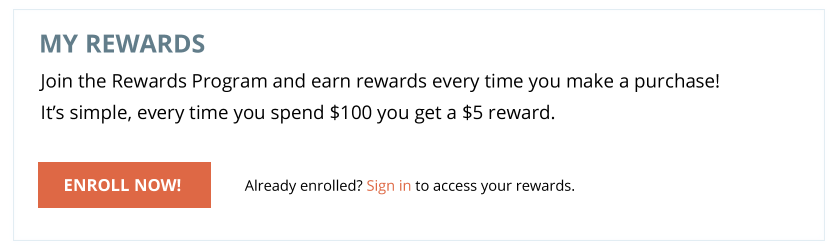
Not Logged In or Enrolled
On this version of the page, the widget should provide some short marketing copy to encourage users to either login and see their rewards or enroll. A sample is provided here:
Logged In, Not Enrolled
In the case where a user is signed in and not enrolled (and auto-enrollment is not being used), the user should be prompted to easily enroll. This is typically done with a checkbox to agree to the program terms and a one-click enrollment. A sample is provided here:
Logged In, Enrolled
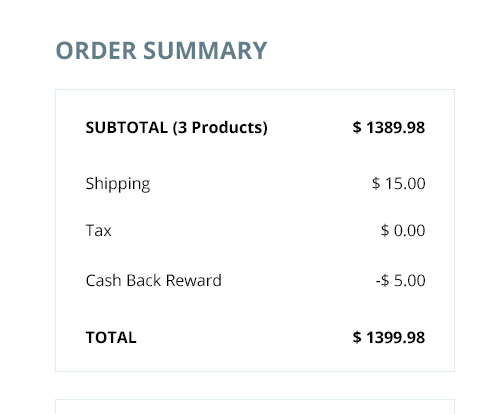
In the case where a user is signed in and is enrolled, the user should have the opportunity to see their current balance as well as apply rewards to their current checkout. If they choose to apply their rewards balance, it should be displayed as a discount on the cart summary. An example of the enrolled, signed-in version of the widget is provided here:
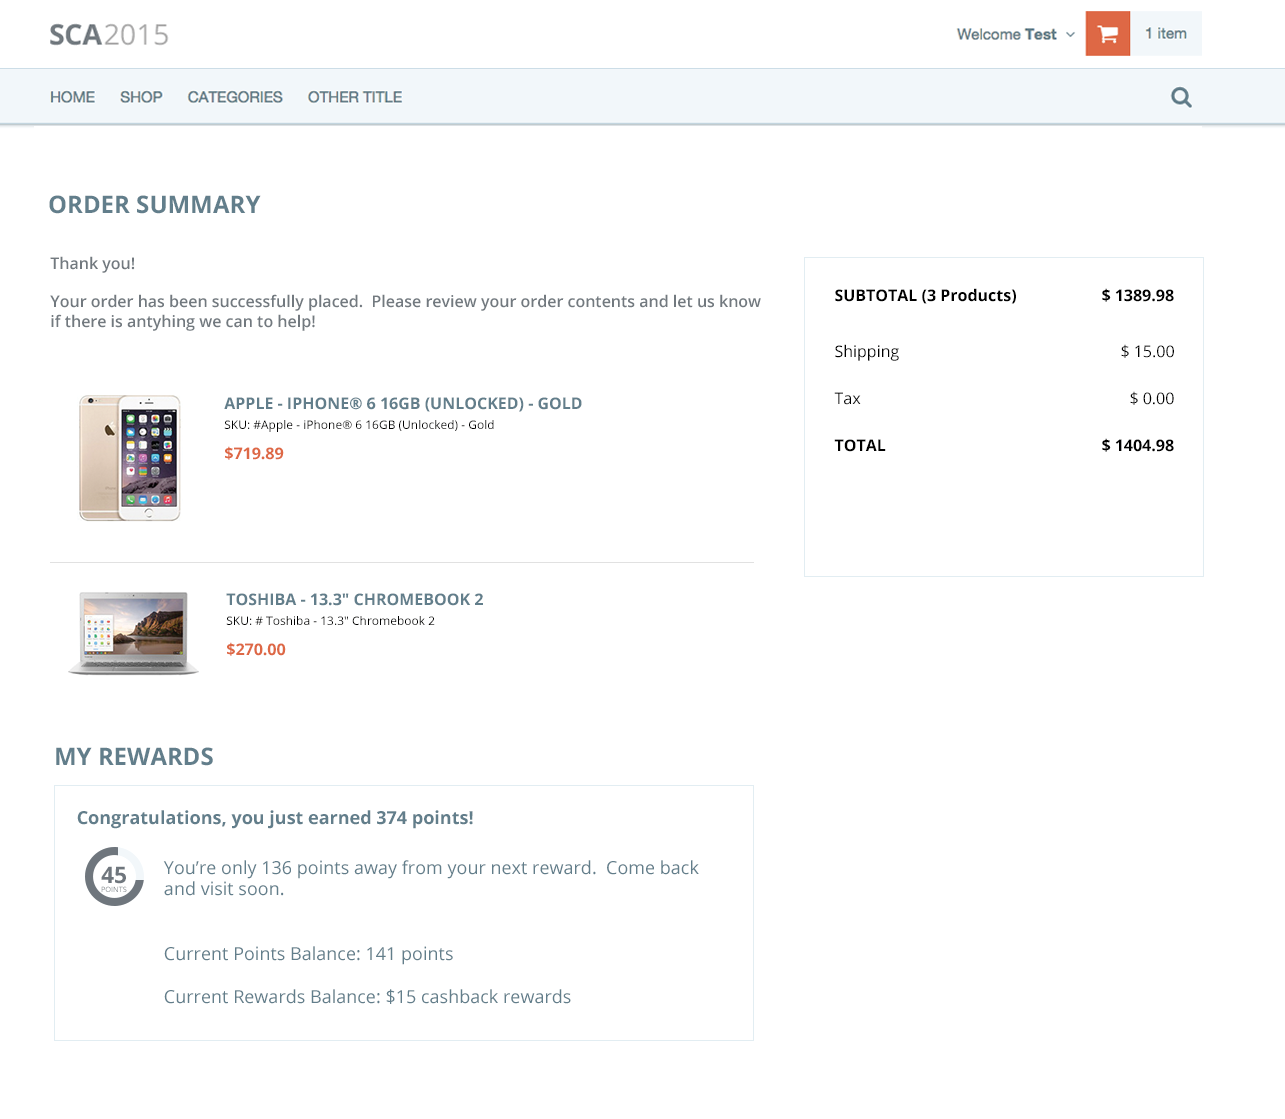
![]() Order summary example with reward applied:
Order summary example with reward applied:
Enrollment & Balance Widget
The purpose of building an enrollment and balance widget is twofold:
- Make it easy for customers to enroll in the program.
- Show customers balances so they are reminded about the rewards they are earning, are more incentivized to complete checkout and either earn or redeem rewards in the process.
The widget (much like the cart widget) should have various states corresponding both with a user’s logged in/out status as well as enrolled/not-enrolled status. Depending on whether auto-enrollment is configured you may not have different views since every logged in user would be enrolled.
Recommended Widget Locations
While this is ultimately up to each merchant, driving enrollment is the first step in being able to drive additional customer activity via the Clutch platform. In addition to that, once enrolled, by showing existing balances, users are more likely to have increased conversion rates as they are driven to earn more rewards and take advantage of redeeming rewards on upcoming checkouts. With that in mind we recommend the following locations:
- Product Details Pages
- Category Browse Pages
- My Account
- Home Page
Customer Not Recognized or Enrolled
When a customer is not logged into their buyer account, the Enrollment/Balance widget will display a brief message encouraging the customer to sign into their buyer account and then enroll in the loyalty program and the details of the program.
Customer Recognized and Enrolled
When a customer is logged into the buyer account and enrolled in the loyalty program, the Enrollment/Balance widget will display the customer’s point/punch balance in addition to the reward credit balance.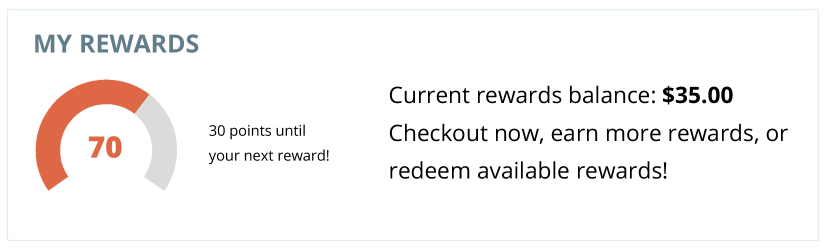
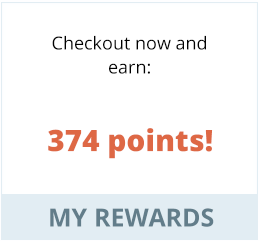
Widget: Potential Rewards
The purpose of the potential rewards widget is to show the points or other configured rewards that a customer could earn with the purchase of an item they are viewing or the value of everything in their cart.
This widget would not require any API calls, the calculations would be made by the website. Additionally these could be formatted and styled in any way. A general recommendation on placement is near the add to cart and checkout buttons as they help customers make the step of beginning or completing the purchase.
| For Product Pages | For Shopping Cart |
 |
 |
Widget: Checkout Confirmation
After the customer has completed their transaction, it’s important to reinforce the positive behavior. Placing a rewards widget on the purchase confirmation page can do this. A sample is provided here: