To log custom properties on custom events, use the campaign result logEvent, with eventType C, the relevant category ID and specific ID and customProperties as a list of custom properties. One custom property is defined as:
Key: This is the key of the property and maps to a data extension attribute in SFMC.
Value: Can contain merge variables that will be resolved before saving the custom attribute on the event (and before sending it over to SFMC).
Full Setup for Entry Sources
Step 1
Set up the entry source (without a SKU) on https://stage-portal.clutch.com/sf/entrysources This will create the Clutch event and the SFMC data extension for the API entry source.
Step 2
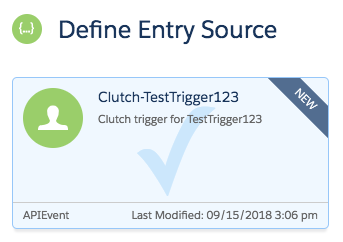
Try setting up a test SFMC journey from scratch ick an ‘API event’ entry source. A similar image to the one below should appear.
Step 3
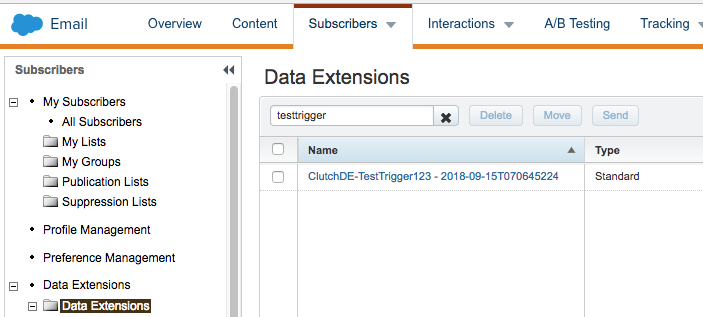
In SFMC, go to Email Studio, Subscribers, Data Extensions. In the left menu that shows up, go to Data Extensions -> Data Extensions. Type in the name of the entry source to filter down to the relevant Data Extension. The name will be ‘ClutchDE-[entry source name here] – [creation date]:
Step 4
Click on the data extension and go to the ‘Properties’ tab that opens up.

Step 5
Click on ‘Edit Fields’ in the right ‘Fields’ area and click the ‘+’ button that shows up under the contactKey field.

Step 6
Add your field as a ‘Text’ field, a length that matches your data and select ‘nullable’. Do not make it a primary key – you can optionally provide a Default Value. Hit ‘Save fields’ in the top of the ‘Fields’ area when done (SFMC can take a while to complete the ‘save’ operation). This example adds a field called ‘testField’.
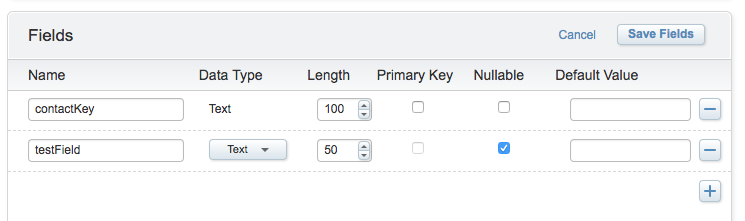
Note that when creating a campaign result, you can now use custom attribute key = ‘testField’.
Step 7
To build a template that uses this variable, go to Email Studio, then Content, and create or edit the relevant template. For editing, go to ‘edit content’.
Step 8
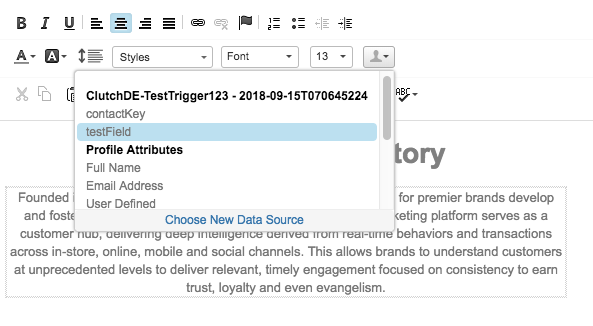
Click on the text area that needs updating.

Step 9
Click on the silhouette button next to the font size dropdown and click on ‘Choose New Data Source’.

Step 10
Go to ‘Data Extensions’ and search for ‘ClutchDE-[your entry source name]’. Click on the data extension row that shows up and click ‘Ok’ on the bottom of the popup.

Step 11
The Data Extension will now show up in the merge variable menu when you click on the silhouette icon. The custom fields will be selectable as merge variables.
NOTE: The custom properties on custom events are only available as merge variables in SFMC if the template is used in a journey that is triggered by an API entry source that was triggered by a logEvent Clutch campaign result that included a custom attribute with that name.
