Follow the steps below to create a Coupon Promotion. You will need to enable coupon settings first. If you have not yet done so, follow the steps here.
Step 1
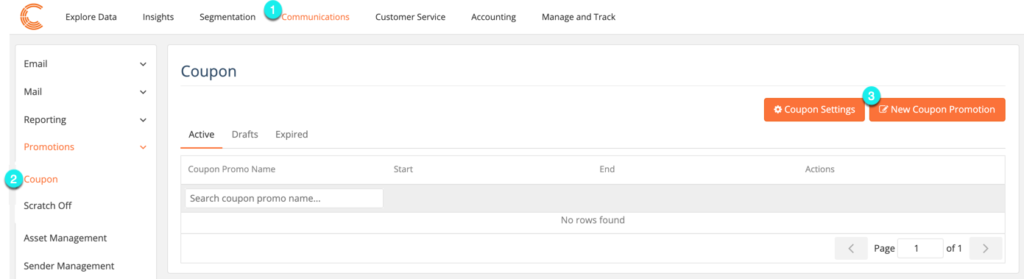
1.1 Navigate to the Communications tab.
1.2 Navigate to the Coupons tab in the Promotions menu.
1.3 Click on the New Coupon Promotion button.
Step 2
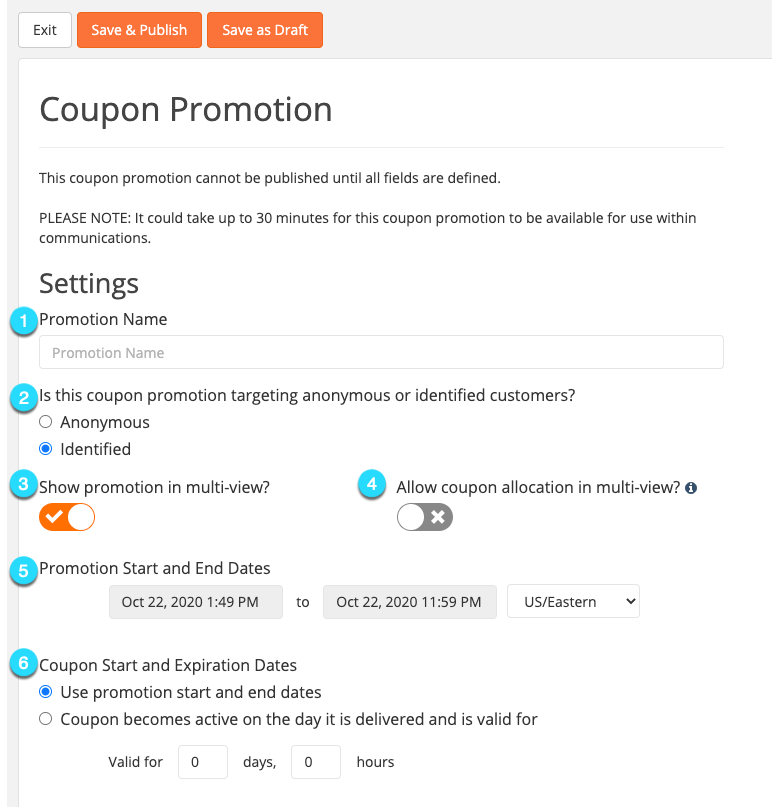
2.1 Create a unique name for the promotion (you can include spaces).
2.2 Determine if this coupon should target Identified or Anonymous users.
2.3 Show promotion in multi-view? By toggling this option ‘on,’ this promotion will be accessible to anyone who navigates to your multi-view landing page. This will only appear if you are targeting identified customers.
2.4 Allow coupon allocation in multi-view?: If this option is ‘on,’ then a coupon will be allocated to anyone who navigates to it. We recommend that this setting is OFF if your coupon is meant to be earned, and ON when your coupon is available to everyone. This will only appear if you are targeting identified customers.
2.5 Select a date and time when the promotion should become active and should expire. Be sure to select the designated time zone. Once a promotion is published, the Start Date can only be changed if it has not yet started and the End Date can only be changed to a later date.
2.6 Coupon Start and Expiration Dates
Use promotion start and end dates: the coupon will start and expire at the times entered above in ‘Promotion Start and End Dates’
Coupon becomes active on the day it is delivered and valid for: Expiration is determined by the day of delivery. Ex. A customer receives a coupon for opting into your loyalty program and it is valid for 30 days only. Bob opts in on Monday and Sally opts in on Tuesday, the expiration dates of their coupons will be different.
 Step 3
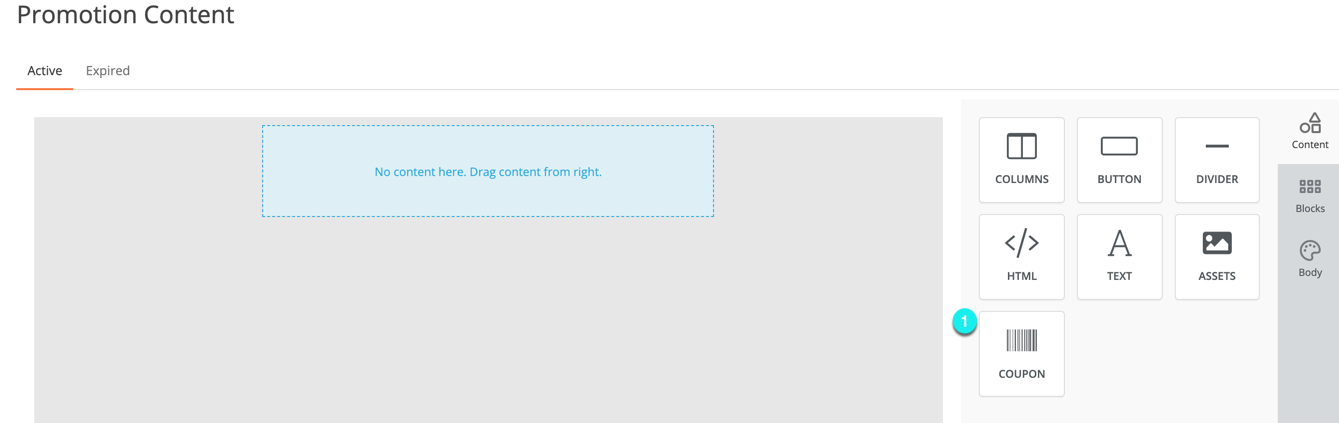
Design the coupon landing page. For instructions on how to use our drag and drop editor, please see the article here.
3.1 Drag the coupon widget from the WYSIWYG editor into the area designated for Active Promotional Content. You can only insert one coupon per promotion.

Step 4
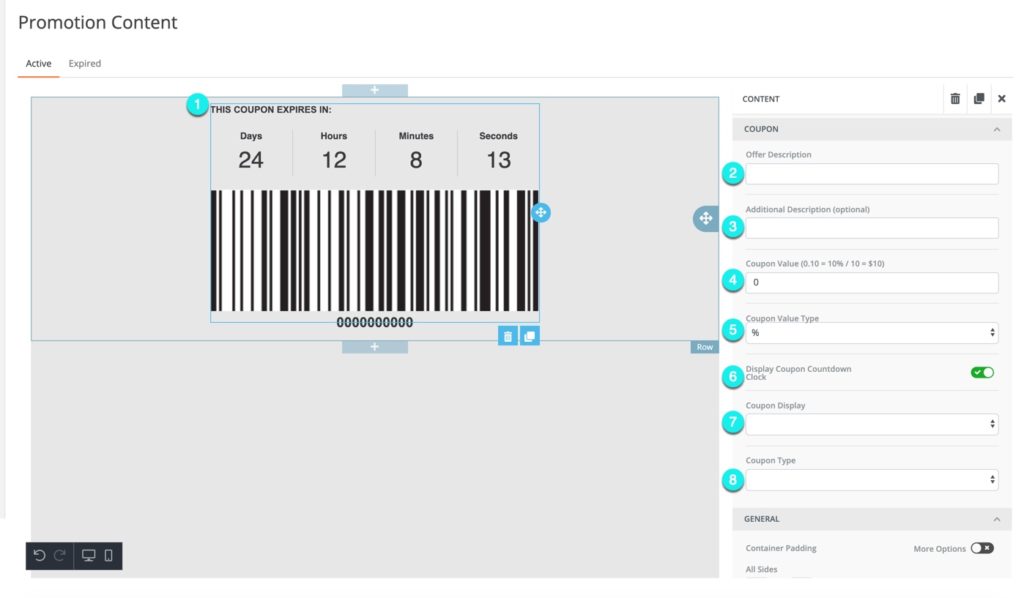
4.1 Click on the coupon widget. This will open the coupon editor in the sidebar.
4.2 Offer Description: Insert a description of your coupon offer. This will appear on the multi-view version of this coupon.
4.3 Additional Description (Optional): This will appear on the multi-view version of this coupon.
4.4 Coupon Value: This captures the API-response value of the coupon so that the value can be communicated to external systems (for example a POS). The value on the promotion and the campaign rule for the coupon must align.
4.5 Coupon Value Type: Select whether the coupon value should be a dollar value (‘$’) or a percentage (‘%’). This works together with Coupon Value.
4.6 Display Coupon Countdown Clock: Toggle the Coupon Countdown Clock on or off. This is a visual tool for the customer to know how much longer their coupon is active for. Turning this feature on or off will not affect coupon expiration time.
4.7 Coupon Display: Select what type of coupon to display.
Barcode with Code: This option will display both the barcode and the numbered code associated with the barcode. You will be prompted to select from two types of Barcode Symbology, Code 128 and Code 39. Check with your POS system for which format is compatible with your terminals.
Barcode Only: This option will display only the barcode. You will be prompted to select from two types of Barcode Symbology, Code 128 and Code 39. Check with your POS system for which format is compatible with your terminals.
Code Only: This option only displays the coupon code. Most appropriate selection for when a customer or employee will enter code manually at checkout.
4.8 Coupon Type: Select the type of coupon from the following options.
Enter Static Code: Enter a static code that everyone shares- all customers will use the same coupon code (ie: SUMMER2019). A static code type is not available for coupons targeting anonymous customers.
Upload Dynamic Codes: Coupons are loaded via .csv file. This file must not contain a header row and the first column must be the coupon ID.
Create Dynamic Codes: Coupon codes can be generated for you based on a set of parameters entered here.
Number of Coupons: Quantity of unique coupons to be created. We recommend you create approximately 10-15% more coupons than are anticipated to be used.
Coupon Prefix: Set of characters/numbers that will appear at the beginning of each coupon.
Dynamic Type: We recommend Incremental be used only when its a requirement for your POS system. Random Alphanumeric is safer and will offer protection from coupon fraud. When selecting Random Alphanumeric, you will also need to select the character length for the code. When creating Dynamic Codes, you will receive an email when your coupons have been generated. They will be available for download in the Report Center located in the Explore Data section of the Portal.
Step 5
5.1 Switch from the Active to Expired tab. Enter expired promotion instructions or desired content so when the coupon expires, a customer who clicks the coupon is given relevant information instead of a blank page.
5.2 Design the Expired page for your coupon. For tips on how to use the WYSIWYG editor, click here.

Step 6
6.1 Once your coupon is ready for use, scroll up to click the Save & Publish button.
6.2 Click Publish. Note that the coupon promotion will not be able to be published until all fields are defined. By clicking Publish, your Coupons will be created. Editing a Published Coupon Promotion will be limited to expiration changes and non-coupon content only.

PLEASE NOTE: It could take up to 30 minutes for the coupon promotion to be available for use within communications.
